5.2 Exporting Data to Delimited Files
5.2.1 Set the working directory
First, we will introduce an important concept called Working Directory. In order to perform data export and data import, you are recommended to set the working directory, since we usually use a path relative to the working directory for interacting with files on the computer in R. To set the working directory, you can click Session on the menu and click Set Working Directory.
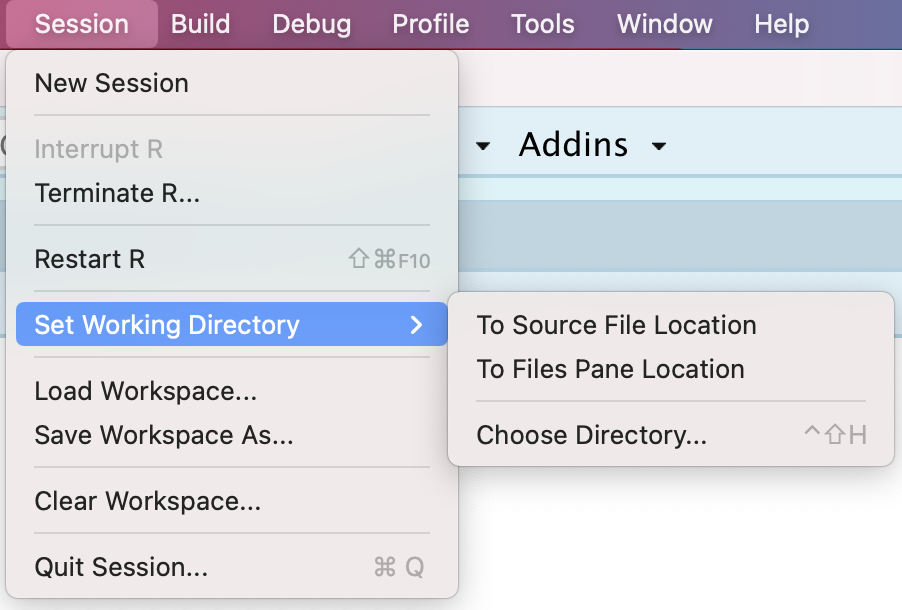
Figure 5.1: Set Working Directory
There are three options under this menu:
- To Source File Location: this will set the working directory as the directory of the current R script.
- To Files Pane Location: this will set the working directory as the directory of the Files Pane on the bottom right of RStudio.
- Choose Directory…: this will open up a window from which you can choose any desired directory.
Keep in mind that if you choose to work under a RStudio project, you might notice an additional choice under the Set Working Directory tab:
- To Project Directory: this will set the working directory as the directory of your current RStudio project.
After selecting one of these options, we can see a line of code containing the function setwd() executed in the console. Indeed, this menu operation is equivalent to using the setwd() function with the argument being the full path or relative path of the desired directory.
Another related function is getwd(), which tells us the absolute path representing the current working directory. When you see an error message saying that a file is not found, it is a good idea to check the current working directory and check whether it is correct.
For illustration purposes, we will create a folder called “data” using the function dir.create() under the current working directory and export/import to/from files in this folder.
5.2.2 Delimited files
In most applications, you will interact with the so-called delimited file. In a delimited file, each row represents a single observation, and it has values separated by the delimiter. In principle, any character (including letters, numbers, or symbols) can be used as a delimiter, with the most commonly used ones being the follow.
| Delimiter | Symbol | Common File Extension |
|---|---|---|
| comma | , |
.csv |
| space | |
.txt |
| tab | \t |
.tsv |
5.2.3 Write an object into a .csv file
First, let’s work with one popular kind of delimited files called comma-separated value file, usually with the file extension .csv. In a .csv file, the delimiter is comma (,).
Let’s work with the gm2004 dataset and export a part of it (first five rows and first four columns) to a .csv file.
library(r02pro)
gm_small <- gm2004[1:5, 1:4]
gm_small
#> # A tibble: 5 × 4
#>   country               year gender continent
#>   <chr>                <dbl> <chr>  <chr>
#> 1 Albania               2004 female Europe
#> 2 Andorra               2004 female <NA>
#> 3 United Arab Emirates  2004 female Asia
#> 4 Argentina             2004 female Americas
#> 5 Armenia               2004 female Asia
Now, let’s write the data frame gm_small into a file called “gm_small.csv” in the currently working directory. To write an object into a .csv file, you can use the write_csv() function in the readr package. Since readr is a sub-package of tidyverse, you can load the package directly if the tidyverse package is installed.
Note here, we are writing the tibble gm_small into a file named “gm_small.csv” in the folder “data”. “data/gm_small.csv” is an example of relative file path. You can also use the absolute file path on your computer, though it is not as collaboration friendly as the relative path, since your collaborator may have a different file structure from yours.
You can verify the .csv file has been indeed created and open the file with RStudio or any text editor to verify its contents.
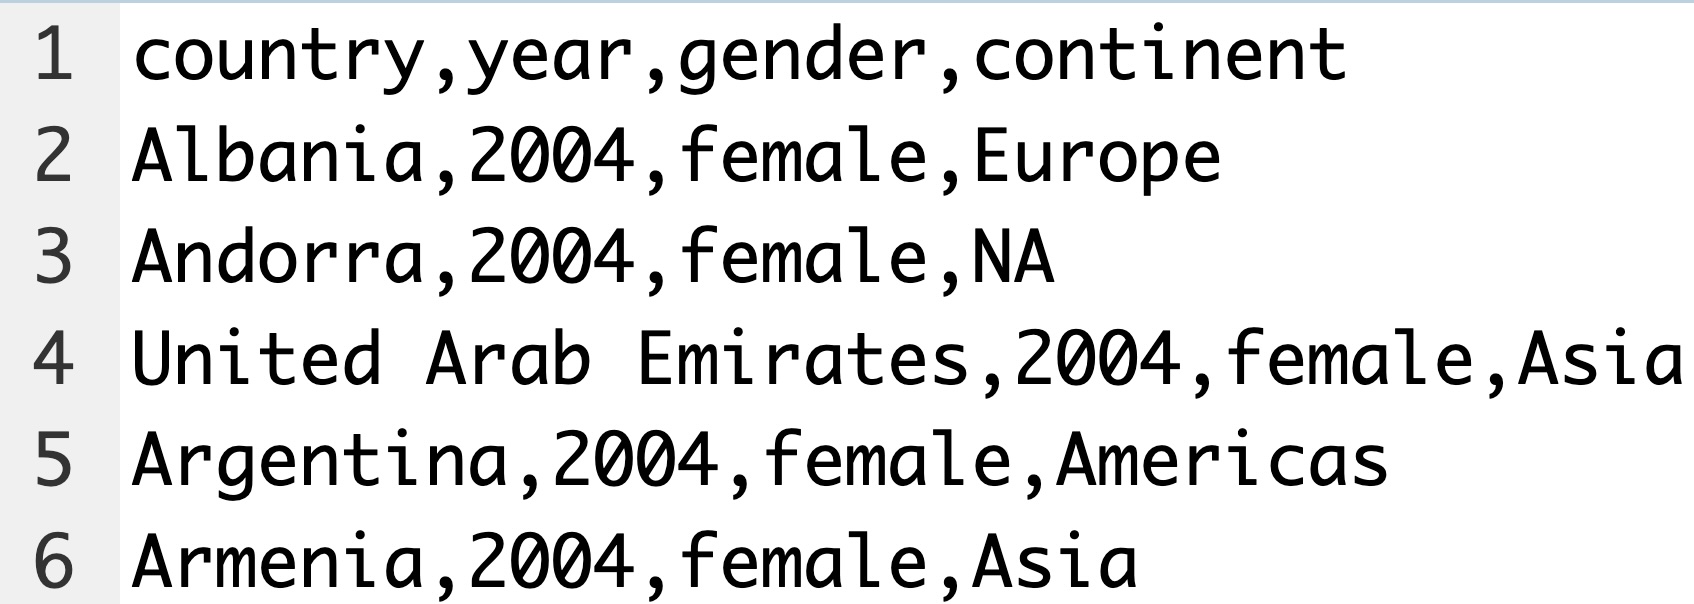
Figure 5.2: File Contents
We can see that all the information has been exported to the .csv file, with commas separating the values on each observation. In particular, you may find out the first row of the file corresponds to the column names. If you don’t want to include the column names, you can set the argument col_names = FALSE.
By default, write_csv() writes the data into a file in which NA is used to represent all the missing values, just like in a tibble. If you want to use another string to represent the missing values in the file, you can set the argument na to be the string.
5.2.4 Write an object into a general delimited file
As introduced at the beginning, there are different types of delimited files, depending on the specific delimiter of your choice. The function write_delim() enables us to write an object into a delimited file with any chosen delimiter. The usage of write_delim() is almost identical to write_csv(), except that it has an additional argument delim, which specifies the delimiter to be used. Let’s see the following example with * as the delimiter.
5.2.5 Exercises
Use R to create the following data frame and assign it to the name my_data.
#>   word number letter
#> 1  one      1      a
#> 2  two     NA      b
#> 3 <NA>      3      c
#> 4 four      4      d
#> 5 five      5      e
First set working directory to the location of your .R or .Rmd file, then write R code to first create a directory called
my_data, and exportmy_datainto a .csv file named “my_data_no_name.csv” without column names into this newly created directory.Write R code to export
my_datainto a delimited file called “my_data_na.csv” to the same directory created in Q1 with#as the delimiter and use999as the indicator for missing values.
